
How to Add an Addon Domain in cPanel
Before adding your addon domain in cPanel, you need to point the domain’s nameservers to the same nameservers used by your primary hosting account. After updating the nameservers, allow some time for DNS propagation. In most cases, the changes take between 12 to 24 hours to fully reflect across the internet.
Follow the steps below to add your addon domain successfully:
Step 1: Log in to cPanel
Access your hosting account and log in to your cPanel dashboard.
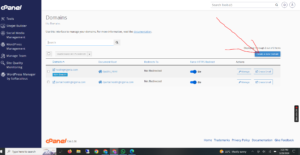
Step 2: Open the Domains Section
Inside cPanel, navigate to the Domains section and click on Domains.

Step 3: Create a New Domain
Click on the Create A New Domain button to begin adding your addon domain.
Step 4: Enter Your Domain Details
Under the Create a New Domain page, fill in the required information:
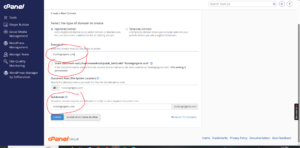
- Domain: Enter your addon domain name (for example,
example.net). - Share document root: Make sure to uncheck this option. Leaving it checked may cause the addon domain to share files with your primary domain.
- Subdomain: This field is usually filled automatically. Simply remove the domain extension such as
.com,.net, or.org. - Leave every other setting at its default value unless you have specific custom configurations.
Step 5: Submit the Changes
Click on Submit to complete the process.
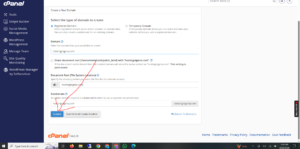
Once the setup is successful, you should see a confirmation message indicating that your addon domain has been created successfully.