
How to Create a Subdomain in cPanel
A subdomain is an extension of your main domain name that helps you organize different sections of your website. For example, blog.example.com is a subdomain of example.com.
Subdomains are commonly used for blogs, client portals, support pages, staging websites, or separate website sections.
Follow the steps below to create a subdomain in cPanel.
Step 1: Log in to cPanel
Sign in to your cPanel hosting account using your login credentials.
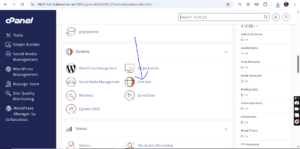
Step 2: Open the Domains Section
From the cPanel dashboard, navigate to the Domains section and click on Domains.
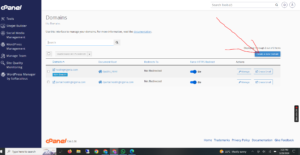
Step 3: Create a New Domain
Click on the Create A New Domain button to begin the setup process.
Step 4: Enter the Subdomain Details
Under the Create a New Domain page, fill in the required information:
- Domain:
Enter your primary domain name. This will serve as the base domain for the subdomain. - Share document root:
Uncheck this option to ensure the subdomain has its own separate folder and website files. - Subdomain:
This field may fill automatically. Remove the domain extension such as.com,.net, or.org, then enter the desired subdomain name. 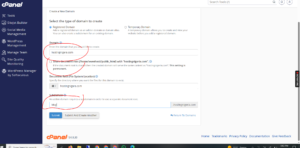
For example:
- Main domain:
example.com - Subdomain:
blog - Final subdomain URL:
blog.example.com
Leave the remaining settings unchanged unless you need a custom configuration.
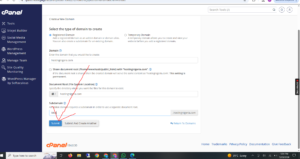
Step 5: Submit the Changes
Click on Submit to create the subdomain.
Subdomain Successfully Created
After the setup is completed, cPanel will display a success message confirming that your subdomain has been created successfully.
Note: DNS propagation may take a few minutes before the subdomain becomes fully accessible online.