
How to Rename a Database in cPanel
Renaming a database can help you keep your hosting account organized, especially when managing multiple websites or applications. cPanel allows you to rename existing MySQL databases quickly through the database management interface.
Before proceeding, ensure that any applications connected to the database are updated with the new database name after the rename is completed.
Step 1: Log in to cPanel
Access your hosting account and log in to your cPanel dashboard.
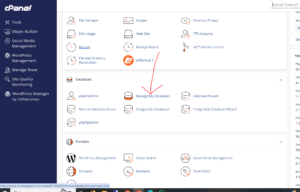
Step 2: Open MySQL Databases
In the Databases section, click on MySQL Databases (or Manage My Databases, depending on your cPanel theme).
Step 3: Locate the Database
Scroll down to the Current Databases section, where you will find a list of all databases associated with your hosting account.
Find the database you want to rename and click Rename next to it.

Step 4: Enter the New Database Name
In the rename field, enter your preferred database name.
Choose a descriptive and recognizable name that makes database management easier.

Step 5: Confirm the Changes
Click Proceed to save the new database name.
Database Successfully Renamed
Once the process is complete, cPanel will display a confirmation message indicating that the database has been renamed successfully.
Important Considerations
After renaming a database, you may need to update your website or application’s configuration files with the new database name.
Common applications that may require updating include:
- WordPress (
wp-config.php) - Joomla (
configuration.php) - Drupal (
settings.php) - Magento (
env.php)
Failure to update the configuration may result in database connection errors.
Benefits of Renaming Databases
Renaming databases can help you:
- Organize multiple websites more effectively.
- Use clearer naming conventions.
- Simplify database management and maintenance.
- Improve account administration.
Tip: Before renaming a database, create a backup to ensure you can restore your data if any configuration issues occur afterward.