
How to Add an MX Record in cPanel
An MX Record (Mail Exchanger Record) is a DNS record that tells the internet which mail server is responsible for receiving email messages for our domain. Whether we’re using our hosting provider’s email service or a third-party provider like Google Workspace or Microsoft 365, configuring the correct MX records ensures that emails are delivered properly.
Using cPanel’s Zone Editor, we can easily add or modify MX records for our domain.
What Is an MX Record?
An MX record specifies the mail server that handles incoming emails for a domain.
For example, when someone sends an email to:
info@example.com
The MX record tells the sender’s mail server where that email should be delivered.
MX records are commonly used for:
- Setting up business email accounts
- Connecting to Google Workspace
- Using Microsoft 365 email services
- Configuring external mail servers
- Managing email routing
Step 1: Log in to cPanel
Access your hosting account and log in to your cPanel dashboard.
Step 2: Open the Zone Editor
In the Domains section, click on Zone Editor.

This tool allows us to manage DNS records for all domains hosted in our account.
Step 3: Locate Your Domain
Under the Domains section, find the domain you want to configure.
Under the Actions column, click + MX Record.

A popup window will appear.
Step 4: Enter the MX Record Details
Fill in the required information.
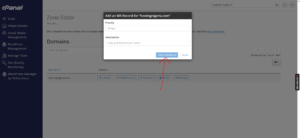
Priority
The priority determines which mail server should be used first.
Lower numbers have higher priority.
For example:
- 0 – Primary mail server
- 10 – Secondary mail server
- 20 – Backup mail server
Most domains only require a single record with a priority of 0.
Destination
Enter the hostname of the mail server responsible for receiving emails.
Examples:
For a local mail server:
mail.example.com
For Google Workspace:
smtp.google.com
For Microsoft 365:
example-com.mail.protection.outlook.com
Be sure to use the exact values provided by your email service provider.
Step 5: Add the MX Record
Once you’ve entered the required information, click Add an MX Record.
If the record is added successfully, cPanel will display a confirmation message.
DNS Propagation Time
Although the MX record is created immediately, DNS changes may take some time to propagate globally.
In most cases, changes become active within 12 to 24 hours, although many networks update much sooner.
Common Uses for MX Records
We often use MX records when:
- Setting up custom email addresses
- Migrating email services
- Connecting Google Workspace to our domain
- Using Microsoft 365 email
- Configuring external mail providers
Best Practices for Managing MX Records
To avoid email delivery issues, we recommend:
- Using the exact values provided by your email provider.
- Double-checking MX priorities before saving.
- Removing outdated MX records after migration.
- Allowing enough time for DNS propagation.
Tip: If emails stop working after updating MX records, don’t panic. DNS changes can take up to 24 hours to fully propagate worldwide, and email delivery may be inconsistent during this period.