
How to Create an Additional Web Disk Account in cPanel
cPanel’s Web Disk feature allows us to access and manage files on our hosting account as if they were stored locally on our computer. While we can use our main cPanel credentials to connect to Web Disk, we can also create additional Web Disk accounts with access limited to specific directories.
This is especially useful when we want to grant team members, developers, or clients access to certain folders without giving them access to the entire hosting account.
Why Create an Additional Web Disk Account?
Creating separate Web Disk accounts allows us to:
- Provide access to specific directories only.
- Improve account security.
- Collaborate with developers or team members.
- Avoid sharing our main cPanel login credentials.
- Manage permissions more effectively.
Step 1: Log in to cPanel
Access your hosting account and log in to your cPanel dashboard.
Step 2: Open Web Disk
In the Files section, click on Web Disk.

This will open the Web Disk management page, where we can create and manage Web Disk users.
Step 3: Create an Additional Web Disk Account
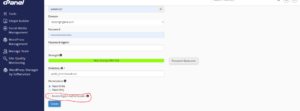
Under Create an Additional Web Disk Account, enter the required details.

Username
Enter a username for the new account.
Example:
folderx
Password
Enter a secure password or click Password Generator to automatically create a strong password.
Directory
Specify which folder the user should have access to.
For example:
public_html/folderx
If we leave this field blank, the user will have access to the entire home directory.
Limiting access to a specific folder provides better security and control.
Permissions
Select the appropriate permissions based on the level of access required.
Important Note for Windows Users
If you’re using Windows, enable Digest Authentication for better compatibility.
However, if your server has a valid SSL certificate issued by a trusted Certificate Authority and you’re connecting securely through port 2078, enabling Digest Authentication may not be necessary.
Step 4: Create the Account
Once all details have been entered, click Create.

Your new Web Disk account will be created immediately.
Accessing the Web Disk Account
After creating the account, we can use the newly generated login credentials to connect to Web Disk and access the assigned directory.
Best Practices for Web Disk Accounts
To improve security and organization, we recommend:
- Creating separate accounts for different users.
- Restricting access to only the required folders.
- Using strong passwords.
- Removing unused Web Disk accounts.
- Avoiding sharing your primary cPanel credentials.
When Should We Use Web Disk Accounts?
Web Disk accounts are ideal when we need to:
- Share files with clients or team members.
- Give developers access to a project directory.
- Manage files remotely.
- Separate user permissions within our hosting account.
Tip: Restricting a Web Disk account to a specific directory helps protect sensitive files and ensures users only have access to the folders they actually need.