
How to Deactivate and Delete a WordPress Plugin
Over time, you may find that some WordPress plugins are no longer needed. Keeping unused plugins installed can clutter your dashboard and even create security risks if they aren’t regularly updated.
Fortunately, WordPress makes it easy to deactivate and permanently remove plugins directly from the dashboard.
In this guide, you’ll learn how to deactivate and delete WordPress plugins safely.
Why Remove Unused Plugins?
Deleting plugins you no longer use can help you:
- Improve website security.
- Reduce unnecessary files and clutter.
- Prevent plugin conflicts.
- Simplify website maintenance.
- Improve overall performance.
Note: You must deactivate a plugin before you can delete it.
Step 1: Log in to the WordPress Dashboard
Sign in to your WordPress Admin Dashboard using your username and password.
Step 2: Open the Installed Plugins Page
From the left-hand menu, navigate to:
Plugins → Installed Plugins
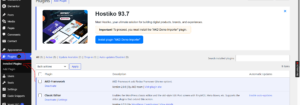
This page displays all the plugins currently installed on your website.
Step 3: Deactivate the Plugin
Locate the plugin you want to remove.
For example, if you want to disable the Hello Dolly plugin, click Deactivate beneath the plugin name.
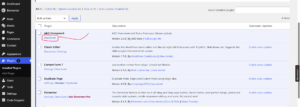
The plugin will immediately stop functioning, but its files will still remain on your server.
How to Delete a Plugin in WordPress
Once a plugin has been deactivated, the Delete option will appear below its name.
Click Delete.
A confirmation message may appear. Click OK to permanently remove the plugin from your website.
Congratulations! You’ve successfully deleted the plugin.
What Happens When You Delete a Plugin?
Deleting a plugin removes its files from your WordPress installation. However, some plugins may leave behind:
- Database tables
- Plugin settings
- Temporary files
- Cached data
Certain plugins provide an option to remove all data during uninstallation. If available, review those settings before deleting the plugin.
Best Practices Before Deleting Plugins
Before removing a plugin, it’s a good idea to:
- Create a website backup.
- Verify that the plugin is no longer needed.
- Check whether another plugin depends on it.
- Deactivate the plugin first and test your website.
- Remove only one plugin at a time if troubleshooting issues.
Common Reasons to Deactivate a Plugin
You may want to deactivate a plugin when:
- Troubleshooting website errors.
- Testing plugin compatibility.
- Replacing it with another plugin.
- Improving website speed.
- Temporarily disabling a feature.
Deactivating a plugin doesn’t remove its files, so you can reactivate it later if needed.
Alternative Method: Delete Plugins via cPanel
If you can’t access the WordPress dashboard, you can remove plugins through cPanel:
- Log in to cPanel.
- Open File Manager.
- Navigate to:
public_html/wp-content/plugins
- Locate the plugin folder you want to remove.
- Right-click the folder and select Delete.
Warning: Deleting plugins manually via cPanel should only be done if you cannot access the WordPress dashboard.
Conclusion
Regularly removing unused plugins is one of the simplest ways to keep your WordPress website secure and organized. By deleting plugins you no longer need, you’ll reduce maintenance overhead and minimize potential security risks.
Tip: Keep only the plugins you actively use. Unused plugins can become outdated over time and may expose your website to vulnerabilities.