
How to Create an Email Autoresponder in cPanel
If you are going on vacation, taking time off, or will be unavailable for an extended period, you can set up an email autoresponder in cPanel. An autoresponder automatically sends a predefined message to anyone who emails you, letting them know that you are away and when they can expect a response.
Follow the steps below to create an email autoresponder in cPanel.
Step 1: Log in to cPanel
Access your hosting account and log in to your cPanel dashboard.
Step 2: Open the Autoresponders Tool
In the Email section, click on Autoresponders.

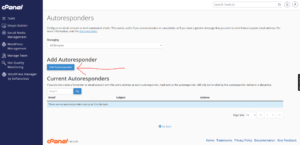
Step 3: Add a New Autoresponder
On the Autoresponders page, click Add Autoresponder.
Step 4: Configure the Autoresponder Settings
Complete the required fields as follows:
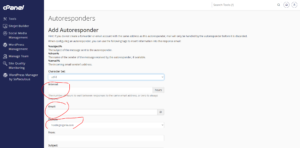
Interval
Specify the number of hours the system should wait before sending another autoresponse to the same email address.
For example, if you set the interval to 24 hours, the same sender will receive only one automated response per day.
Enter the email account for which you want to enable the autoresponder.
For example, to create an autoresponder for:
support@example.com
Enter only:
support
in the Email field.
Domain
If your hosting account contains multiple domains, select the appropriate domain from the drop-down menu.
From
Enter the name that recipients will see as the sender of the automated response.
Example:
- Support Team
- Customer Service
- John Smith
Subject
Enter a subject line for your autoresponse.
Examples:
- Out of Office
- I Am Currently on Vacation
- Thank You for Your Email
Body
Compose the message that will be sent automatically to anyone who emails you.
Example:
“Thank you for your email. I am currently away from the office and may have limited access to email. I will respond to your message as soon as possible upon my return.”
Step 5: Set the Start and Stop Time
Choose when the autoresponder should begin and when it should stop sending automatic replies.
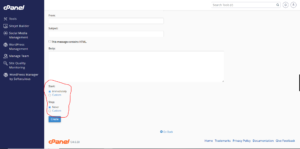
This allows the system to activate and deactivate the autoresponder automatically without any further action from you.
Step 6: Create the Autoresponder
Click Create to save your settings and activate the autoresponder.

Autoresponder Successfully Created
Once the setup is complete, cPanel will display a confirmation message indicating that the autoresponder has been created successfully.
Benefits of Using an Autoresponder
An email autoresponder can help you:
- Inform contacts that you are unavailable.
- Set expectations for response times.
- Maintain professional communication while away.
- Reduce follow-up emails from customers and clients.
- Provide alternative contact information during your absence.
Tip: Keep your autoresponder message concise, professional, and informative. Include an alternative contact person if urgent assistance may be required while you are away.