
How to Edit or Remove an MX Record in cPanel
MX records (Mail Exchanger records) determine where emails sent to our domain are delivered. If we’re switching email providers, correcting mail settings, or removing outdated configurations, cPanel’s Zone Editor makes it easy to edit or delete existing MX records.
In this guide, we’ll show you how to manage MX records using cPanel.
Why Edit or Remove an MX Record?
We may need to update or remove an MX record when:
- Migrating to a new email provider.
- Setting up Google Workspace or Microsoft 365.
- Correcting email delivery problems.
- Removing obsolete mail servers.
- Updating mail routing priorities.
Incorrect MX records can prevent emails from being received, so it’s important to review any changes carefully.
Step 1: Log in to cPanel
Access your hosting account and log in to your cPanel dashboard.
Step 2: Open the Zone Editor
In the Domains section, click on Zone Editor.

The Zone Editor allows us to view and manage all DNS records associated with our domains.
Step 3: Manage the Domain
Locate the domain whose MX record you want to modify.
Under the Actions column, click Manage.
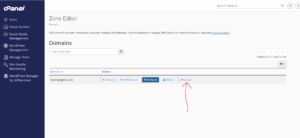
This will display all DNS records configured for the selected domain.
Step 4: Locate the MX Record
Scroll through the list or use the search box to find the MX record you want to edit or remove.
To Edit an MX Record
- Click Edit next to the MX record.

- Update the necessary details, such as:
- Priority
- Destination mail server
- Click Save Record to apply the changes.

To Remove an MX Record
- Locate the record you wish to delete.
- Click Delete.
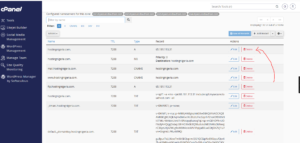
- Confirm the deletion when prompted.
The MX record will be removed immediately from your DNS zone.
DNS Propagation Time
Although changes are saved instantly, they may take some time to propagate across the internet.
In most cases, DNS updates become effective within 12 to 24 hours, though some networks may reflect the changes sooner.
Best Practices When Managing MX Records
To avoid email interruptions, we recommend:
- Verifying the MX settings provided by your email service provider.
- Keeping a backup of existing records before making changes.
- Double-checking priority values.
- Removing outdated mail servers after migration.
- Allowing enough time for DNS propagation.
Common Email Services That Use MX Records
MX records are commonly configured for:
- Google Workspace
- Microsoft 365
- Zoho Mail
- cPanel Email Accounts
- Third-party email hosting providers
Tip: Before deleting an MX record, ensure that it is no longer being used. Removing the wrong record can stop your domain from receiving emails until the correct settings are restored.